Making a Beer Can Cook Stove
- muleequestrian

- Apr 2
- 3 min read
If you’re like me, you might have an abundance of beer cans handy. Often before I make a run to the recycling center with bags of cans, I occasionally find an alternate use for some of the cans.

After rinsing the remaining beer out, I cut them like this…. I use the bottom out of two different cans and the top of a third. The can bottoms are just a little bit tougher than the tops. The one top I do retain for use becomes the inner baffle of the alcohol stove. Each section is cut about 1 1/2” wide. The cuts don’t need to be pretty, just functional.

I use a triangle shaped file to form baffles on the inner liner. These are not cut into the thin metal, but pressed to make indentations. The baffle is NOT necessary to the function of the stove, but it does improve the flame control coming out of the top holes.

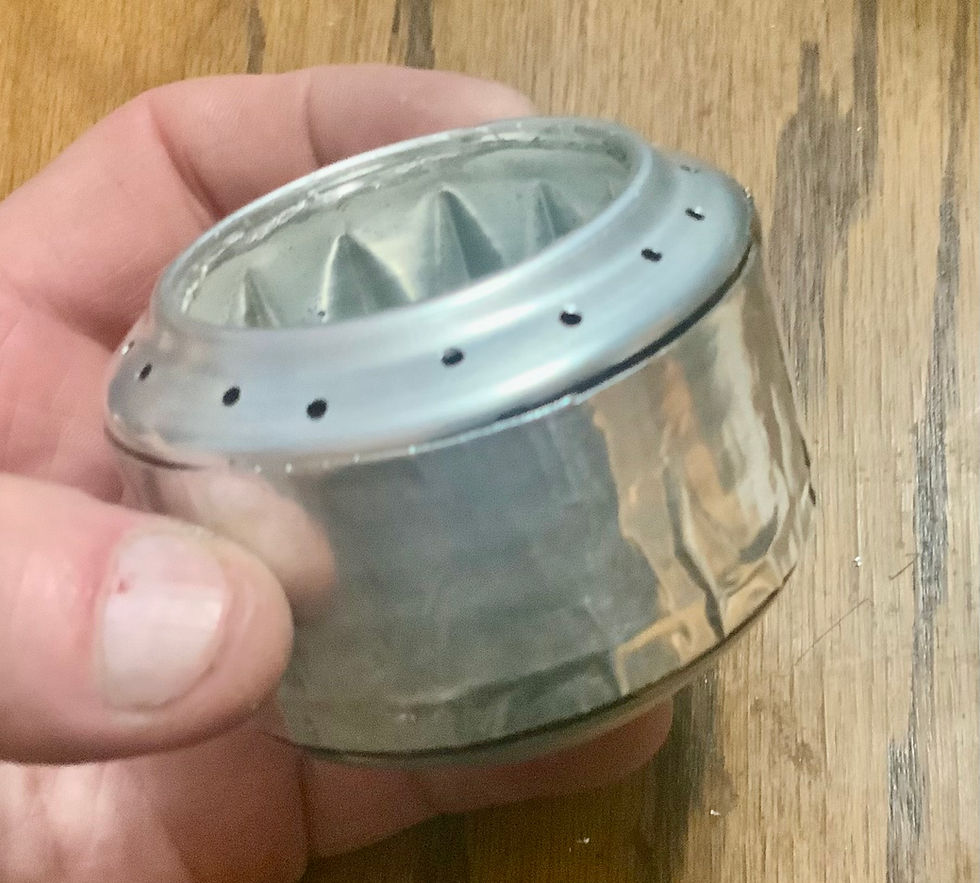
This is what the inner baffle looks like when you are done with it. There’s no set number of indentations you need. I simply start one, then go to the opposite side and make another. Then work my way around the can alternating between the sides until the baffle is complete.

I press the inner baffle into the tank and seat it firmly.

I then start on the top of the stove. I use the bottom of a cut off can because the aluminum is thicker and stronger. I drill 1/16th” holes around the perimeter in the same way as the alternating baffles. Drilling on opposite sides until I have a ring of holes all the way around. You COULD use a 1/8” drill bit if you wanted bigger holes and higher flame, but 1/16” seems to balance the fire with fuel efficiency for me. Your mileage may vary.

Now I carefully press top over the bottom of the stove with the baffle inside.

The final touch is a strip of metal tape wrapped around the entire stove body to seal it.

The stove is ready to use. Now keep in mind a few things. First — there’s no flame control. You can’t adjust up or down for blazing or simmering. It is what it is. Secondly — you can’t really do much to snuff out the flames unless you make a snifter to suffocate the fire. I merely let it burn until it runs out of fuel, then let it cool a few minutes.
Denatured alcohol seems to be the best fuel by far. On occasion I will run a bottle of Iso-Heet fuel additive that you add to gas tanks on a car in winter to absorb water. It burns well too.

My first test burn sitting on my kitchen stove for safety reasons. I’ve made a number of these over the years, and they seem to last fairly well.

These are similar to the European Triangia alcohol stoves that sell for a good amount of money. It’s not as fancy, it’s made of beer cans instead of brass, and there’s no threaded lid to fit. But as quick and easy as these are to make — well — I don’t really want to buy a more expensive model of alcohol stove. These are great for the one thing I use them for…. And here they truly shine. If I’m traveling ultralight on a day trip and I’m carrying a freeze dried bag meal…. These alcohol stoves are perfect for boiling water to rehydrate the bag meal for a hot lunch out on the trail.


Comments